In the last post (Automatically fill in captcha code in course selection system), we exploited the "Play Audio" button function to obtain the captcha code in the course selection system from my college. Today, we will be going through another approch to identify the captcha code by training a CNN model with TensorFlow and Keras.
A captcha code from the course selection system.

Install Needed Packages
Below are the environment and package versions that I perform the training in this post.
MacOS 10.14.6
Python: 3.7.3
numpy: 1.18.0
scikit-learn: 0.22
TensorFlow: 2.0.0
Pillow: 6.2.1
If lacking any of these packages, just simply install them with the following commands.
NumPy: pip install numpy
scikit-learn: pip install scikit-learn
TensorFlow: pip install tensorflow
Pillow: pip install Pillow
Data Preparation
Data preparation is the most time consuming part during machine learning. For this reason, I have prepared 100 captcha code for training inside in the training folder, and 5 for testing insiede the testing folder. The download link is provided in below. Inside the zip file, the filenames represent the correct captcha code of the captcha images. Unzip it and put it in the same folder with the code we will be writing later.
Build Up and Train the Model
In the first step, create an empty file called train.py and import all the packages that will be using later.
import numpy as np
import os
from sklearn.model_selection import train_test_split
from tensorflow import keras
from tensorflow.keras import layers
from tensorflow.keras import models
from tensorflow.keras.preprocessing.image import img_to_array
from tensorflow.keras.preprocessing.image import load_img
Initiallize the variables.
epochs = 10       #Training times
img_rows = None   #Height of the captcha code image
img_cols = None   #Weight of the captcha code image
digits_in_img = 6 #Number of digits of the captcha code
x_list = list()   #All captcha code images will be stored in the here
y_list = list()   #All the correct answer of captcha code images will be stored in the here
x_train = list()  #All captcha code images for training will be stored in the here
y_train = list()  #All the correct answer of captcha code images for training will be stored in the here
x_test = list()   #All captcha code images for testing will be stored in the here
y_test = list()   #All the correct answer of captcha code images for testing will be stored in the here
Now, define a function that splits out each digit of captcha code given a captcha code image. Each splitted digit of captcha code will be stored in x_list, and the correct answer of each splitted digit of captcha code will be stored in y_list.
def split_digits_in_img(img_array, x_list, y_list):
    for i in range(digits_in_img):
        step = img_cols // digits_in_img
        x_list.append(img_array[:, i * step:(i + 1) * step] / 255)
        y_list.append(img_filename[i])
Next, iterate through all the .png captcha code images from training folder and split out the digits by calling the function we just wrote.
img_filenames = os.listdir('training')

for img_filename in img_filenames:
    if '.png' not in img_filename:
        continue
    img = load_img('training/{0}'.format(img_filename), color_mode='grayscale')
    img_array = img_to_array(img)
    img_rows, img_cols, _ = img_array.shape
    split_digits_in_img(img_array, x_list, y_list)
After splitting all the captcha codes, we will have to turn the corrects answer of captcha codes into categorical format. For example, 1 is represented as [0, 1, 0, 0, 0, 0, 0, 0, 0, 0,], 2 is represented as [0, 0, 1, 0, 0, 0, 0, 0, 0, 0,], etc.
When the conversion is done, break our data into 2 piles with one pile for training and the other for testing.
y_list = keras.utils.to_categorical(y_list, num_classes=10)
x_train, x_test, y_train, y_test = train_test_split(x_list, y_list)
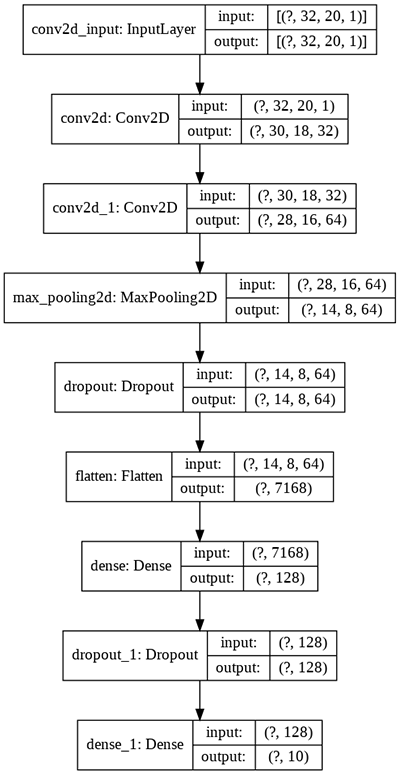
For the model part, we first determine whether if there exists any trained model file called cnn_model.h5. If the file exists then load it into our program, otherwise, create a new CNN model with the following structure.
if os.path.isfile('cnn_model.h5'):
    model = models.load_model('cnn_model.h5')
    print('Model loaded from file.')
else:
    model = models.Sequential()
    model.add(layers.Conv2D(32, kernel_size=(3, 3), activation='relu', input_shape=(img_rows, img_cols // digits_in_img, 1)))
    model.add(layers.Conv2D(64, (3, 3), activation='relu'))
    model.add(layers.MaxPooling2D(pool_size=(2, 2)))
    model.add(layers.Dropout(rate=0.25))
    model.add(layers.Flatten())
    model.add(layers.Dense(128, activation='relu'))
    model.add(layers.Dropout(rate=0.5))
    model.add(layers.Dense(10, activation='softmax'))
    print('New model created.')

model.compile(loss=keras.losses.categorical_crossentropy, optimizer=keras.optimizers.Adam(), metrics=['accuracy'])
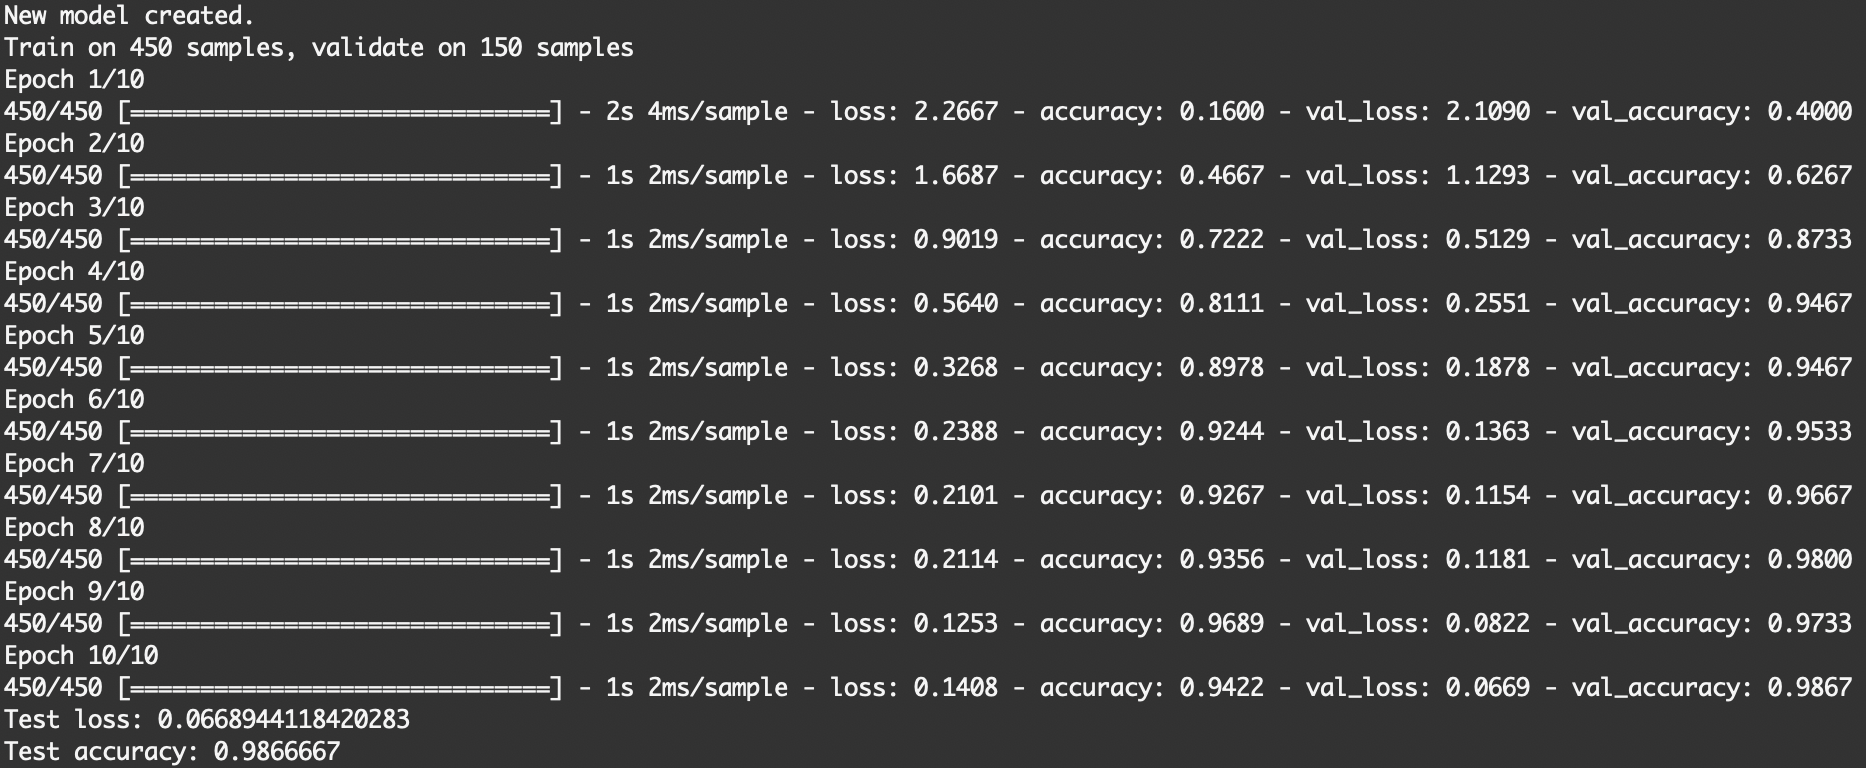
With our model created or loaded, we can now hop in the training part. Because of the model is not too complicated, laptops can perform the training for 10 epochs within a minute. When the training is done, evaluate the model and display the accuracy. If nothing goes wrong, save the model.
model.fit(np.array(x_train), np.array(y_train), batch_size=digits_in_img, epochs=epochs, verbose=1, validation_data=(np.array(x_test), np.array(y_test)))

loss, accuracy = model.evaluate(np.array(x_test), np.array(y_test), verbose=0)
print('Test loss:', loss)
print('Test accuracy:', accuracy)

model.save('cnn_model.h5')
Awesome. We have completed our first part, now save the file and close it. The code can be executed by calling python train.py to traing the model. During training, we can see that the losses drop gradually with the accuracies rise in the same time. The test accuracy comes to 98% at the end.
With our captcha code recognition model being well-trained, it's time to try out some captcha code images that the model has never seen before form testing folder.
Test the Model with Blind Data
This time, create another file called predict.py and import the needed packages.
import numpy as np
import os
import sys
from tensorflow.keras import models
from tensorflow.keras.preprocessing.image import img_to_array
from tensorflow.keras.preprocessing.image import load_img
Initiallize the variables and set numpy to display at most nine decimal places for floating numbers.
img_rows = None
img_cols = None
digits_in_img = 6
model = None
np.set_printoptions(suppress=True, linewidth=150, precision=9, formatter={'float': '{: 0.9f}'.format})
Similar as what we just wrote above in train.py: define a function that splits out the captcha code.
def split_digits_in_img(img_array):
    x_list = list()
    for i in range(digits_in_img):
        step = img_cols // digits_in_img
        x_list.append(img_array[:, i * step:(i + 1) * step] / 255)
    return x_list
Load the trained model which named cnn_model.h5. If the file doesn't exist, terminate the program.
if os.path.isfile('cnn_model.h5'):
    model = models.load_model('cnn_model.h5')
else:
    print('No trained model found.')
    exit(-1)
Prompt the user to input a captcha code image for prediction. The input image will be loaded as grayscale. Next, we split out the digits in the captcha code and store them into x_list.
img_filename = input('Varification code img filename: ')
img = load_img(img_filename, color_mode='grayscale')
img_array = img_to_array(img)
img_rows, img_cols, _ = img_array.shape
x_list = split_digits_in_img(img_array)
We then predict the each splitted captcha code in order. (The model also supports predicting in batch as well.)
varification_code = list()
for i in range(digits_in_img):
    confidences = model.predict(np.array([x_list[i]]), verbose=0)
    result_class = model.predict_classes(np.array([x_list[i]]), verbose=0)
    varification_code.append(result_class[0])
    print('Digit {0}: Confidence=> {1}    Predict=> {2}'.format(i + 1, np.squeeze(confidences), np.squeeze(result_class)))
print('Predicted varification code:', varification_code)
This is all for our predict.py. Now let's try some captcha code images from testing folder, just simply execute python predict.py and type in the filename. The result will somehow looks like below, with six digits being correctly identified.

Machine learning is amazing isn't it:)