開發時大家都會使用git為程式碼做版控,好讓不同開發環境以及佈署環境的程式得以統一。今天我們來體驗一下一個叫Sequelize的DB migration工具來為我們的DB schema做版控。
把DB schema版控起來最大的好處是DB schema就可以像程式碼一樣在各個環境都是統一的,不會發生在stg環境驗完測完沒問題的程式因為上到prod環境時忘記加欄位導致prod環境的錯誤狂噴。再來是對於新加入專案的開發人員非常友好,因為開發人員只要使用migration工具下完up指令就可以將本機的資料庫建好很快就可以進入開發,甚至也可以指定版本建出幾天前的舊版DB schema。那接下來就進入我們今天的主題吧。
目錄
- 安裝sequelize-cli
- 設定sequelize-cli連線
- 建立一個新的migration A
- 再建立一個新的migration B
- 指定執行至第一個migration A就好
- 執行完所有migration至最新
- 退版撤掉剛剛的migration B
- 退版撤掉所有migration
- 總結
第1步:安裝sequelize-cli
本篇我們使用的migration工具叫Sequelize,他其實也是Node.js的ORM套件,並且支援主流的Oracle、Postgres、MySQL、MariaDB、SQLite跟SQL Server等等的DB。首先先安裝Sequelize對應使用到的DB驅動與sequelize-cli,我們專案使用的是Postgres所以會裝pg、pg-hstore,如果是MySQL的話則是mysql2。
npm install --save pg pg-hstore sequelize
npm install --save-dev sequelize-cli
完畢後試試看Sequelize是否正常運作如下。
npx sequelize-cli --help
這些是Sequelize可以使用的指令集。
Sequelize CLI [Node: 18.0.0, CLI: 6.4.1, ORM: 6.21.3]

sequelize-cli <command>

Commands:
  sequelize db:migrate                        Run pending migrations
  sequelize db:migrate:schema:timestamps:add  Update migration table to have timestamps
  sequelize db:migrate:status                 List the status of all migrations
  sequelize db:migrate:undo                   Reverts a migration
  sequelize db:migrate:undo:all               Revert all migrations ran
  sequelize db:seed                           Run specified seeder
  sequelize db:seed:undo                      Deletes data from the database
  sequelize db:seed:all                       Run every seeder
  sequelize db:seed:undo:all                  Deletes data from the database
  sequelize db:create                         Create database specified by configuration
  sequelize db:drop                           Drop database specified by configuration
  sequelize init                              Initializes project
  sequelize init:config                       Initializes configuration
  sequelize init:migrations                   Initializes migrations
  sequelize init:models                       Initializes models
  sequelize init:seeders                      Initializes seeders
  sequelize migration:generate                Generates a new migration file
  sequelize migration:create                  Generates a new migration file
  sequelize model:generate                    Generates a model and its migration
  sequelize model:create                      Generates a model and its migration
  sequelize seed:generate                     Generates a new seed file
  sequelize seed:create                       Generates a new seed file

Options:
  --version  Show version number
  --help     Show help
第2步:設定sequelize-cli連線
Sequelize的連線資訊預設會放在config/config.json內,格式如下,再根據自己的設定修改。如果是個新專案還沒有config/config.json以及migrations/跟models/資料夾的話,需要先執行npx sequelize init初始化Sequelize。
{
  "development": {
    "username": "root",
    "password": 123456,
    "database": "database_development",
    "host": "127.0.0.1",
    "dialect": "postgres"
  },
  "test": {
    "username": "root",
    "password": 123456,
    "database": "database_test",
    "host": "127.0.0.1",
    "dialect": "postgres"
  },
  "production": {
    "username": "root",
    "password": 123456,
    "database": "database_production",
    "host": "127.0.0.1",
    "dialect": "postgres"
  }
}
第3步:建立一個新的migration A
一個migration需要實作up()跟down()達成升版跟退版目的。使用以下指令讓Sequelize為我們生成up()跟down()的骨架。
npx sequelize-cli migration:generate --name init-hell-world
回到migrations/資料夾,可以看到多了個20220802145931-init-hell-world.jsmigration檔案,並且骨架已經填好如下。
'use strict';

module.exports = {
  async up (queryInterface, Sequelize) {
    /** Add altering commands here. */
  },

  async down (queryInterface, Sequelize) {
    /** Add reverting commands here. */
  }
};
修改一下檔案,讓我們來創立一個叫users的表吧。
'use strict';

module.exports = {
  async up (queryInterface, Sequelize) {
    await queryInterface.createTable('users', {
        id: Sequelize.INTEGER,
        gender: Sequelize.INTEGER,
        name: Sequelize.STRING(100),
    });
  },

  async down (queryInterface, Sequelize) {
    await queryInterface.dropTable('users');
  }
};
編輯後存檔,我們已經完成了第一個migration了~
第4步:再建立一個新的migration B
為了擬真實驗Sequelize手動上版的功能,我們再來新增一個migration吧。
npx sequelize-cli migration:generate --name add-column-address-to-user-table
打開migrations/20220802151637-add-column-address-to-user-table.js,這次為migration A新增出來的表新增地址的欄位。
'use strict';

module.exports = {
  async up (queryInterface, Sequelize) {
    await queryInterface.addColumn(
        'users',
        'address',
        { type: Sequelize.STRING },
    );
  },

  async down (queryInterface, Sequelize) {
    await queryInterface.removeColumn('users', 'address');
  }
};
到目前為止,我們已經有兩個migration待執行了,可以使用以下指令查看所有migration的狀態。
npx sequelize-cli db:migrate:status
輸出如下:
Sequelize CLI [Node: 18.0.0, CLI: 6.4.1, ORM: 6.21.3]

Loaded configuration file "config/config.json".
Using environment "development".
down 20220802145931-init-hell-world.js
down 20220802151637-add-column-address-to-user-table.js
跟預期的一樣,目前兩個migration是down的狀態。
第5步:指定執行至第一個migration A就好
我們來小試一下如果想手動跑migration至指定的版本,可以使用以下指令。
npx sequelize-cli db:migrate --to 20220802145931-init-hell-world.js
輸出:
Sequelize CLI [Node: 18.0.0, CLI: 6.4.1, ORM: 6.21.3]

Loaded configuration file "config/config.json".
Using environment "development".
== 20220802145931-init-hell-world: migrating =======
== 20220802145931-init-hell-world: migrated (0.042s)
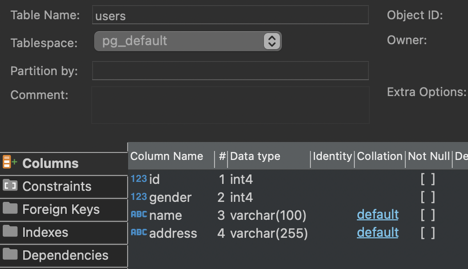
接著我們到DB看一下table的狀態,users是我們migration A預期產出的表沒錯。
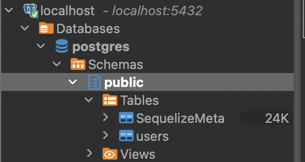

至於SequelizeMeta則是Sequelize自動生成用於幫助他記錄他已經執行過哪些migration用的,可以看到我們的第一個migration A已經被記錄在table內了。
此時如果再下一次指令查看所有migration的狀態。
npx sequelize-cli db:migrate:status
可以看到migration A已經是up的狀態。
Sequelize CLI [Node: 18.0.0, CLI: 6.4.1, ORM: 6.21.3]

Loaded configuration file "config/config.json".
Using environment "development".
up 20220802145931-init-hell-world.js
down 20220802151637-add-column-address-to-user-table.js
第6步:執行完所有migration至最新
剛剛我們讓Sequelize跑migration至指定的版本,但假如今天積了很多migration要跑、或正在部署一個新環境,希望一次跑完所有migration至最新的狀態,我們可以使用剛剛的指令,但是不要帶參數to。
npx sequelize-cli db:migrate
輸出:
Sequelize CLI [Node: 18.0.0, CLI: 6.4.1, ORM: 6.21.3]

Loaded configuration file "config/config.json".
Using environment "development".
== 20220802151637-add-column-address-to-user-table: migrating =======
== 20220802151637-add-column-address-to-user-table: migrated (0.021s)
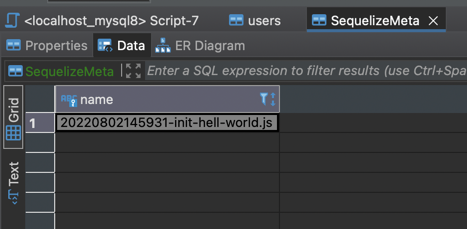
回到DB看一下table的狀態,users果真被加上了address欄位。
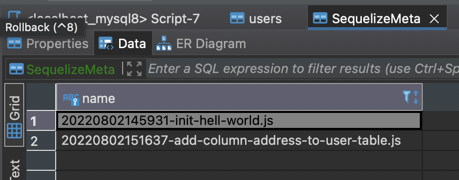
SequelizeMeta也多了剛剛跑完的記錄。
目前兩個migration確實都是up的狀態。
npx sequelize-cli db:migrate:status
Sequelize CLI [Node: 18.0.0, CLI: 6.4.1, ORM: 6.21.3]

Loaded configuration file "config/config.json".
Using environment "development".
up 20220802145931-init-hell-world.js
up 20220802151637-add-column-address-to-user-table.js
第7步:退版撤掉剛剛的migration B
上版上到一半發現程式有bug不想上了,身為工程師的我們希望撤掉最近一次執行的migration可以使用以下指令。
npx sequelize-cli db:migrate:undo
輸出:
Sequelize CLI [Node: 18.0.0, CLI: 6.4.1, ORM: 6.21.3]

Loaded configuration file "config/config.json".
Using environment "development".
== 20220802151637-add-column-address-to-user-table: reverting =======
== 20220802151637-add-column-address-to-user-table: reverted (0.021s)
或帶上參數to指定要退版(包含參數的版本)至migration A。
npx sequelize-cli db:migrate:undo:all --to 20220802151637-add-column-address-to-user-table.js
輸出:
Sequelize CLI [Node: 18.0.0, CLI: 6.4.1, ORM: 6.21.3]

Loaded configuration file "config/config.json".
Using environment "development".
== 20220802151637-add-column-address-to-user-table: reverting =======
== 20220802151637-add-column-address-to-user-table: reverted (0.027s)
產圖好累,就相信我他有跑就對了,或去DB眼見為憑。
打指令看一下migration的狀態,跟預期的一樣很乖。
npx sequelize-cli db:migrate:status
Sequelize CLI [Node: 18.0.0, CLI: 6.4.1, ORM: 6.21.3]

Loaded configuration file "config/config.json".
Using environment "development".
up 20220802145931-init-hell-world.js
down 20220802151637-add-column-address-to-user-table.js
第8步:退版撤掉所有migration
當開發完一個微服務想將在本機DB建的schema清掉時,可以使用以下指令,將會撤掉本機DB的migration。
npx sequelize-cli db:migrate:undo:all
輸出:
Sequelize CLI [Node: 18.0.0, CLI: 6.4.1, ORM: 6.21.3]

Loaded configuration file "config/config.json".
Using environment "development".
== 20220802151637-add-column-address-to-user-table: reverting =======
== 20220802151637-add-column-address-to-user-table: reverted (0.020s)

== 20220802145931-init-hell-world: reverting =======
== 20220802145931-init-hell-world: reverted (0.016s)
請千萬小心在production誤下此操作,可能會需要在被發現前收拾行李搬家。
第9步:總結
到這裡,我們已經學會使用Sequelize這個DB migration工具來為DB schema進行版控了。當然,凡事不只有優點也會有缺點。使用migration工具時,由於異動欄位是屬於DDL的語句,有些資料庫像是MySQL底層會對異動的表整表加exclusive lock,此時其他DML操作都會blocking直到當個指令調整的schema完畢。由於此操作對不離線更新的service有比較高的危險性,所以比較有規模有DBA的公司對於prod環境還是會傾向手動一條一條DDL指令去下,確保每條DDL都是他親眼看完跑完無誤的,也就不太會依賴migration工具。當然這就是個取捨,如果專案屬於微服務的性質,使用migration工具就會有他的方便所在。